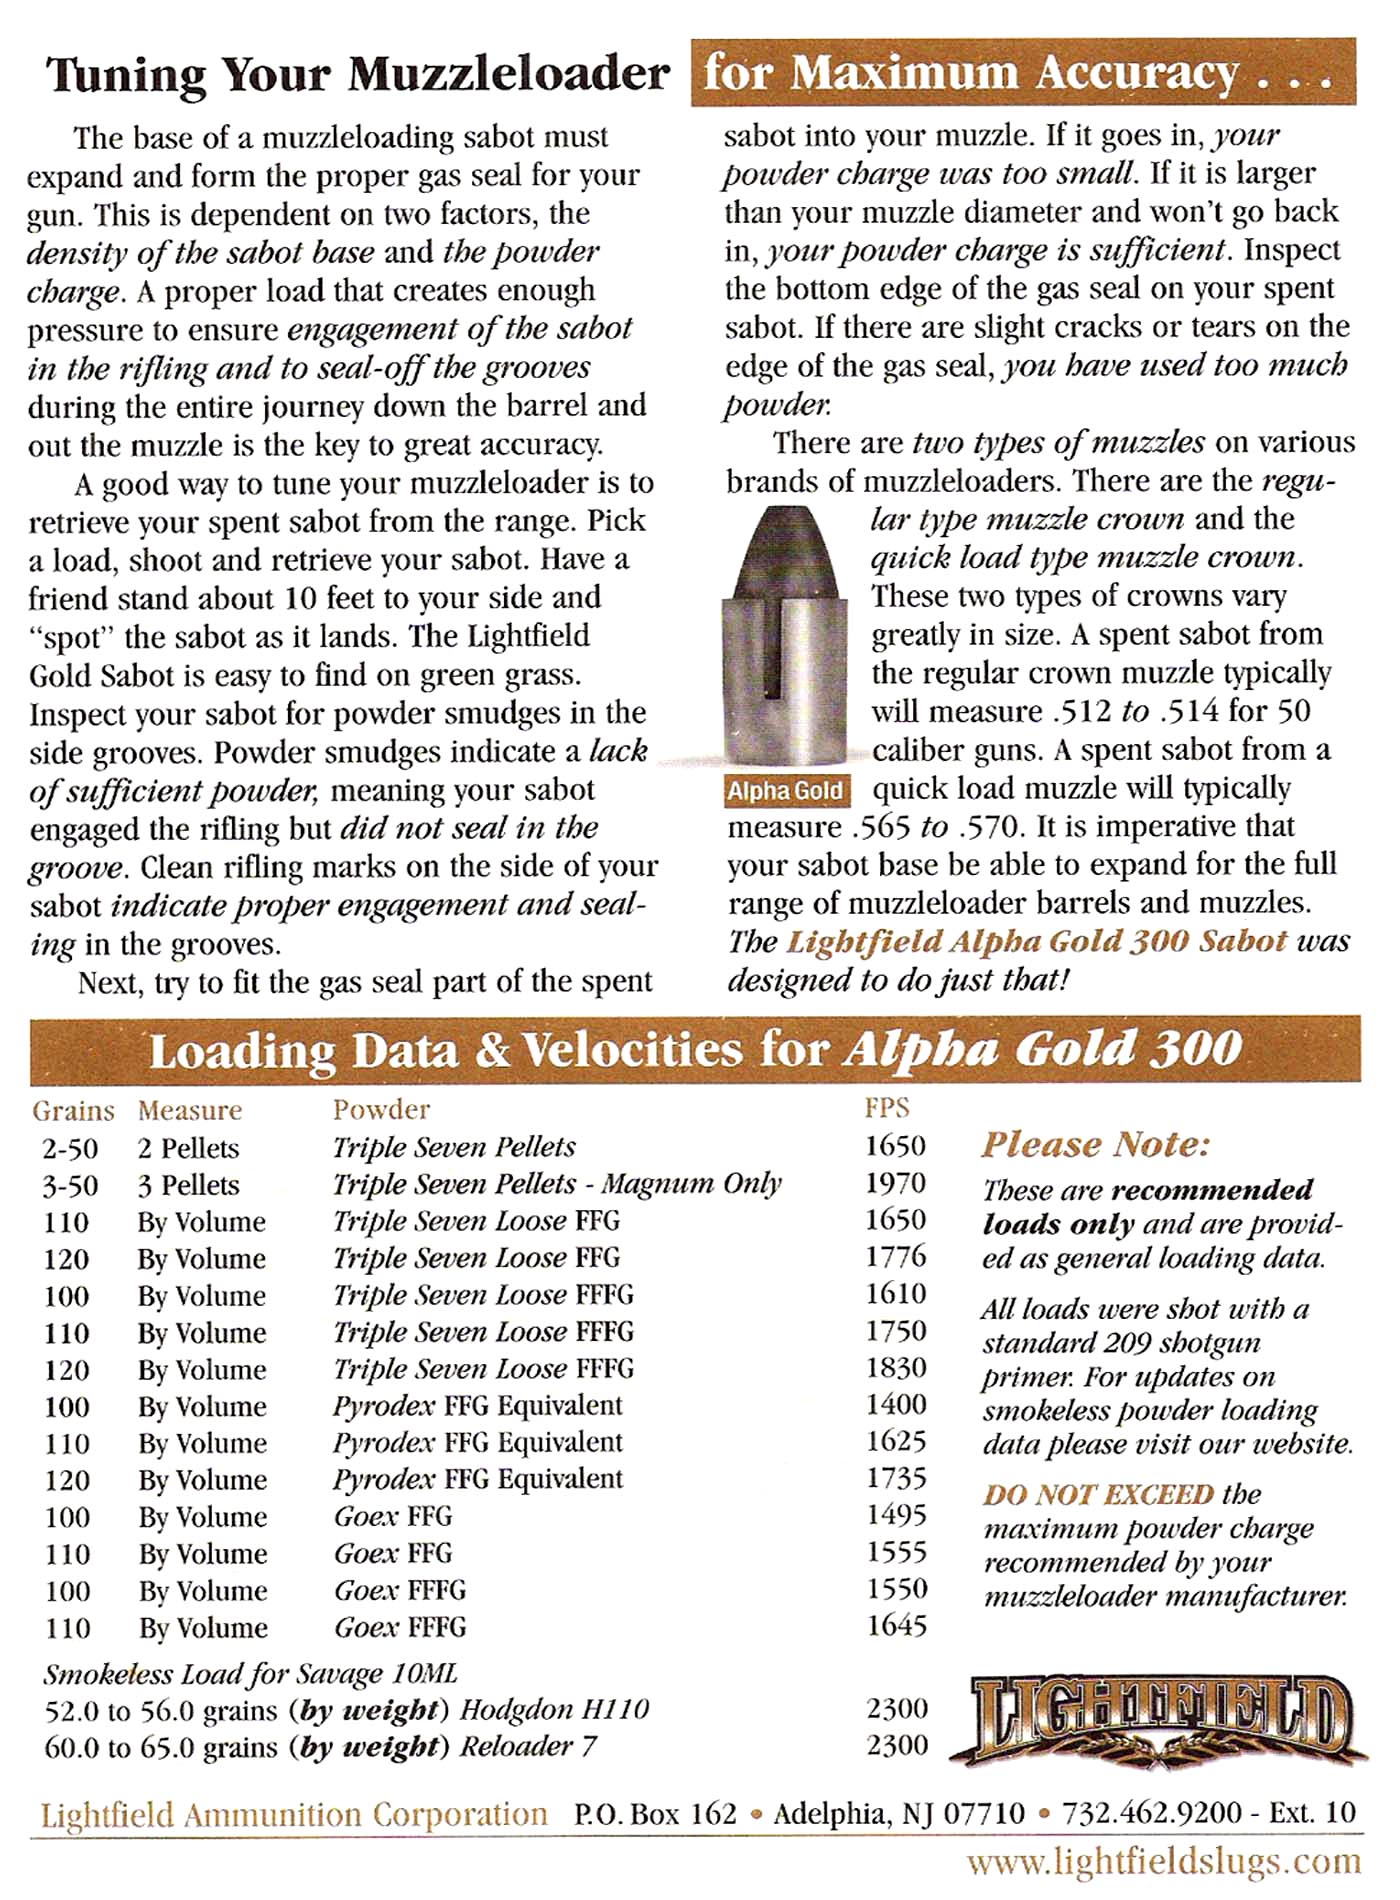
TarHunt built its first prototype slug gun in 1987 and began the manufacture of our first production model in 1990. Between that time and the present the one factor that has become the most evident is that our guns are not magic for the shooter.
Yes, our slug guns will shoot 1 inch groups, but only if the shooter…
- Can find a good lot of slug ammunition;
- Has a good rest to shoot off of and has spent the time necessary to learn how to shoot well off of it;
- Can find a telescope that will continue to work for more than 100 rounds. Most slug gun shooters cannot tell when a scope has gone bad;
- It is an excepted practice that rifles are zeroed (sighted-in) at 100 yards and then checked at 200 and 300 yards ONLY because of their higher velocity. However, Slug/guns (under 1800fps) need to be zeroed at 50 yards to remove all but a 2% chance of having any left or right turned into the scope. Then check your point of impact at 100 and 150 yards if you must, but if you then turn the adjusters again, all you are doing in turning in the wind for the day. As slug accuracy moves us ever closer to 200yd hunting accuracy, it becomes more important than ever to have the gun zeroed LEFT & RIGHT. If you try and use a 100 yard zero; your actual zero could be off as much as 1-foot at 100yds and over 2-feet at 200yds during the fall winds of hunting season;
- The amount of drop is constant on this planet so you drop can be easily be calculated how high above your aiming point that the group needs to form at 50 yards for whatever yardage you wish to zero the gun at, without a false reading from the wind;
- Will spend the time to learn the intricacies of shooting slugs at 100 yards. For example, AT 100 YARDS, a 10 mph crosswind moves a slug 5 to 6 inches at 100 yards. A tail wind causes the impact point of a slug to move up so it looks like it is shooting flatter then it really is, a head wind will move the impact point down more then what the drop is supposed to be. It is evident then, that slug movement of 5 to 7 inches at 100 yards is not uncommon. To take this even a step further, a 15 to 17 mph cross wind, typical of what one might encounter during a November/December deer hunt, will move a slug 9 to 11 inches at 100 yards, near 24 inches at 150 yards, an even 30 inches at 200 yards;
- Remembers to always use a range-finder prior to taking any shot longer than 125 yards;
[/vc_column_text][/vc_column][/vc_row]
HERE IS A METHOD FOR AN (emergency scope ZERO check).
IF YOU DROP YOUR GUN AND YOU DON’T KNOW IF IT IS STILL ZEROED. . .
You can CHECK YOUR a 100 yd. ZERO in the field by firing a shot AT THE CORRESPONDING CLOSE RANGE ZERO.
Measured the distance as good as you can because a little error means ALOT). If your going away from home on a $4500.+ hunt you may want to carry a piece of string cut at the right length the muzzle to the corresponding short range zero.
EXAMPLE: If you were originally sighted in at 100 yards with the Lightfield Mag 20ga than your close range zero point is 18 yards. Fire a shot at a measured 18yards off of a rest, as best you can. If the shot is dead on or just touching the point of aim then the gun is still zeroed at 100 yards. If you are more than 1/2″ off the point of aim, you should make the appropriate scope adjustment back to the point of aim.
NOTE: All 100 yards numbers are in bold black type.
| ITEM |
Yardage your gun was
ZEROED AT:
example 100 (YDS.)
|
THE CLOSE RANGE ZERO
18 (YDS.)
|
3″ MAG-20 |
150 |
10.7 |
|
125 |
13.7 |
|
100 (yards zero) |
18.0 yards close range zero |
|
50 |
39.5 |
| HYBRED EXP 20 GA. |
125 |
11.0 |
|
100 |
14.0 |
|
75 |
20.2 |
|
50 |
24.6 |
| HYBRED LITES |
125 |
8.7 |
|
100 |
11.0 |
|
75 |
15.8 |
|
50 |
24.6 |
| HYBRED EXP |
150 |
8.2 |
|
100 |
13.0 |
|
75 |
19.0 |
|
50 |
29.6 |
| 3″ HYBRED ELITE |
200 |
7.4 |
|
175 |
8.9 |
|
150 |
11.1 |
|
100 |
18.0 |
|
50 |
40.8 |
| 3″ COMMANDER PLUS |
225 |
6.0 |
|
175 |
8.7 |
|
125 |
13.0 |
|
100 |
18.0 |
|
50 |
39.5 |
| 3 1/2″ COMMANDER PLUS |
250 |
6.2 |
|
225 |
7.3 |
|
175 |
10.6 |
|
125 |
16.0 |
|
100 |
14.0 |
|
50 |
48.2 |
| COMMANDER 16 GA. |
150 |
8.5 |
|
125 |
10.7 |
|
100 |
14.0 |
|
50 |
30.8 |
Over the years, there have been hundreds of questions asking about the use of mechanical recoil limiting rests to zero slug guns such as:
“Would it be a wise move to build or use a locking type/heavy rest that would take all human error out of the process of sighting in a slug gun, except knowing when to pull the trigger because of the wind?”
The problem is when you use this type of rest, you artificially make the gun much heavier, more solid, than it is when used in the field.. You will end up sighting the gun in at a heavier artificial weight with a certain amount of muzzle jump. Then when you shoot the gun at game in the field at its normal weight, it WILL SHOOT to a different point of aim because you can no longer limit the muzzle jump to the same position, at the moment the slug leaves the barrel, while hunting, as it did at the range when you were sighting in using a locking/heavy type rest.
This is the same issue with any gun that has significant recoil and muzzle velocities under a 1900-2000fps range. Muzzle loaders/Slug Guns are all in the same boat. The time the bullet spends moving through the barrel (dwell time) during the recoil cycle is the same amount of time that the gun is being pulled off of the target, by recoil, until the bullet exits the barrel.
There is a huge difference in barrel dwell time between 1650-1900fps than guns with muzzle velocities above 3000fps, such as varmint/magnum rifles. At above 3000fps guns move less than .030ths of an inch and the bullet has already exited the muzzle and the dwell time has only a minor effect on the sighting in process. Physical recoil and noise are the main reasons for developing a flinch with those weapons.
This doesn’t even take into consideration the torque that is applied to the gun by a heavy slug spinning upwards of 50,000rpm’s inside the barrel while the slug is moving toward the muzzle when using these types of rests..
Putting something on your shoulder, between you and the gun, is the best you can do to help tame the recoil of a slug gun. The muzzle must be left to jump according to how hard you hold your gun at both ends. Artificially adding weight to the gun by using a weighted rest or similar fixed gun rest may only create a missed deer in the field. You must hold the slug gun in such a manner, while sighting it in, that you can duplicate it in the field while shooting at game!! That includes the amount of muzzle jump you are allowing during the sight-in and gives “Overall Consistency in how you hold/grit the weapon.”
Bottom line, there is no magic fix. You will need to sit down and take somewhat of a thumping while sighting in a slug gun! I know there is a lot of recoil reducing advertisement out there and most of it works OK with rifles. They do reduce recoil with ML/Slug guns but it can have an adverse effect on your true zero! “Let’s not miss the Buck of a Life Time!”
“How you sit while zeroing a slug gun is also very important. Look for some upcoming info in Shooting Guide Pages later this year”.
7-2013 -2
You’ve resigned yourself to the fact that you are going to take the time and effort to get out to the range to zero your gun and to do some target shooting in order to practise before joining a shooting sports league. Here are some tips that will make your time on the range a little more rewarding. It may seem like a lot of trouble, but with the price of sabot slugs, why not make the most of every shot? Alternatively if you’d like to practice your shooting skills you could look into ranges like 717 Armory. When at a shooting range, most people will be trying to improve their shot precision. Practicing is one of the best ways to do that, however, there are other methods. For example, one way of improving your shooting is to look into red dot sights for your gun. Finding a good one can improve your shot significantly. It’s believed that the Leupold LCO is one of the best red dot sights, according to riflescopelevel.com and others. However, using wind flags might also help you out.
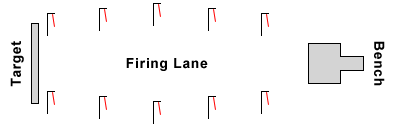
Wind Flags
Make yourself ten wind flags and take them with you every time you go to the range. When properly positioned relative to yourself and the target, these flags will help you learn how varying wind direction and angle will effect your shot placement.
- “Acquire” ten standard metal coat hangers from a nearby closet.
- Cut the hangers at the twisted parts of the hook so that only the straight sections remain.
- Shape the hangers into “L” shapes, making the “L” portion about a foot long.
- Attach a 14 to 18 inch piece of surveyor ribbon or yarn to the end of the “L” portion of the coat hanger.
Flag Placement
As you walk from the bench toward your target, embed one of your coat hanger flags in the ground to the left of your sight line each time a fifth of your firing distance is covered. For example, if you will be shooting at a distance of 50 yards, place a flag every 10 yards. At your target, embed a flag to the right of your sight line and do so each time a fifth of your firing distance is covered as you return to the bench.
Ideally each of these flags should be seen in your scope when you have acquired your target sight picture. The idea here is that you will be able to see how the wind is effecting each one of the flags along your shooting lane at the moment you take your shot. Care should be taken to make sure that the ribbon or yarn portion of your wind flags are not directly in your slug’s flight path.
It is important to use this many flags so that you will get an accurate idea of the wind conditions throughout the range at the moment you take your shot. Without actually shooting, watch the flags through your gun’s scope. You’ll notice that they don’t all point in the same direction all of the time. Some may hang straight down while others are blown in one direction or another, and some may point one way while others point in the opposite direction. You’ll also notice that often the flags to the left of your shooting lane will behave differently than those on the right. Wind conditions associated with each unique flag pattern will effect a slug’s flight differently. As you shoot, note the positions of all the flags and then note where your slug impacts. Over time you will learn how to gauge a slug’s flight path over a variety of wind conditions and will feel confident making the necessary adjustments when shooting game in the field. When attempting to shoot groups on the range you should always take your shots under similar wind conditions.
If you’re a regular at your local shooting range, why not treat yourself to some new gear. Check out Outdoor Empire for range bag reviews.
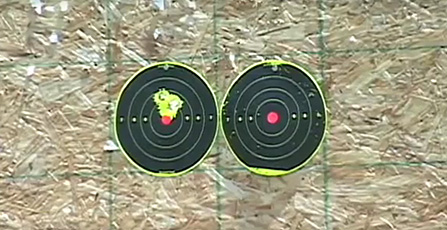
Note: If you could find a day that all the flags are going one direction,at the same speed-same angle, like the example shown above; it would be possible to shoot exactly into ONE HOLE with good ammo and a good slug gun.
From the time you pick up a firearm, whether you bought it yourself, won it in a gun contest, or inherited it from a close friend or relative, until the time you put it back down, you become part of a system over which you have complete control and responsibility. You are the only part of the system that can make a gun safe … or unsafe.
Develop safe shooting habits and remember, firearm safety is up to you. If you are a prohibited gun possessor then handling a gun should not be happening. However, you will need to talk to an attorney to see how they can handle your case. Keep in mind that illegal possession of a firearm could land you in deep trouble, with possible jail time. So, it is important that you deal with the case at the earliest.
It is advisable to be extra cautious in such circumstances because what you don’t know CAN hurt you; please read the following safety rules carefully and follow them always.
Gun Safety
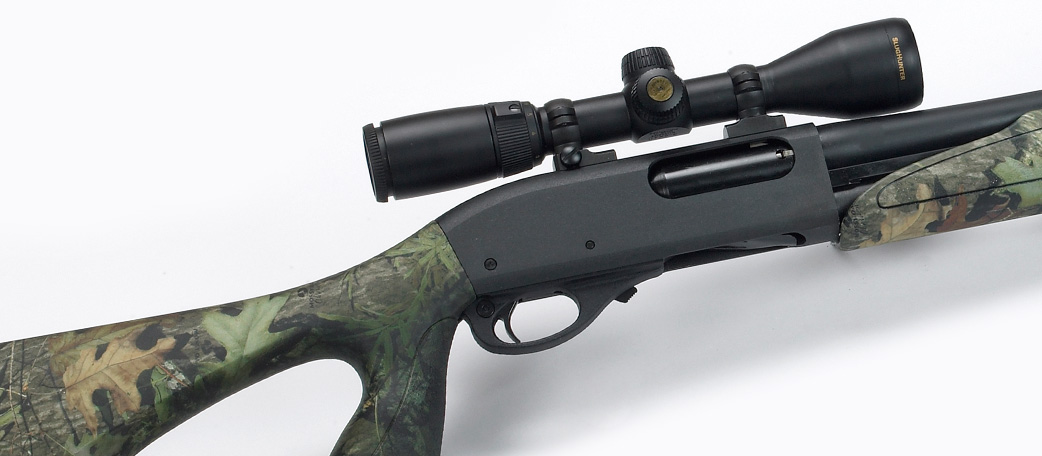
- Consult your Remington Owner’s Manual for the proper care of your 870 DSG firearm.
- Whether or not your DSG is equipped with a muzzle brake, we strongly suggest the use of a muzzle mitt during inclement weather (rain, sleet, snow). Without the muzzle brake protection, the holes in the brake will act as a collector and funnel the water into the bore causing rust or other more serious bore restrictions (i.e., ice-ups, etc.). A muzzle mitt’s thin latex material safely protects the gun barrel from obstruction, yet it can be immediately fired or shot through, with no apparent loss of accuracy or performance, and no harm to the firearm or shooter. Caution: In wet conditions, remove muzzle mitt daily and dry barrel inside and out to eliminate condensation buildup.
- Always keep the muzzle of your firearm pointed in a safe direction. Be particularly aware of this safety rule when you are loading and unloading your weapon. This is the most basic safety rule, and should be followed even though you are “sure” the firearm is unloaded. Never point your gun at anything you do not intend to shoot.
- Before handling any firearm make sure that the weapon is completely unloaded.When cleaning checking/changing choke tubes, and any timer you are not actually attempting to shoot the firearm, make sure the weapon is empty and completely unloaded.
- Do not rely on your firearm’s safety device. Treat every firearm as though it were loaded and could fire at any time.
- Be sure the barrel of your gun is clear of obstructions (i.e., cleaning patches, etc.) before each usage. When you’re finished with cleaning you gun, you might want to put it in somewhere safe like this Stockinger safe. This s especially important if your DSG is equipped with a muzzle brake.
- Become familiar with the mechanical and handling characteristics of your gun prior to using it for the first time.
- Only shoot-in your DSG slug gun at a designated shooting range. Know your backstop area.
- Be sure of your target and what lies beyond. Once a gun is fired, you have given up all control over what the shot will hit.
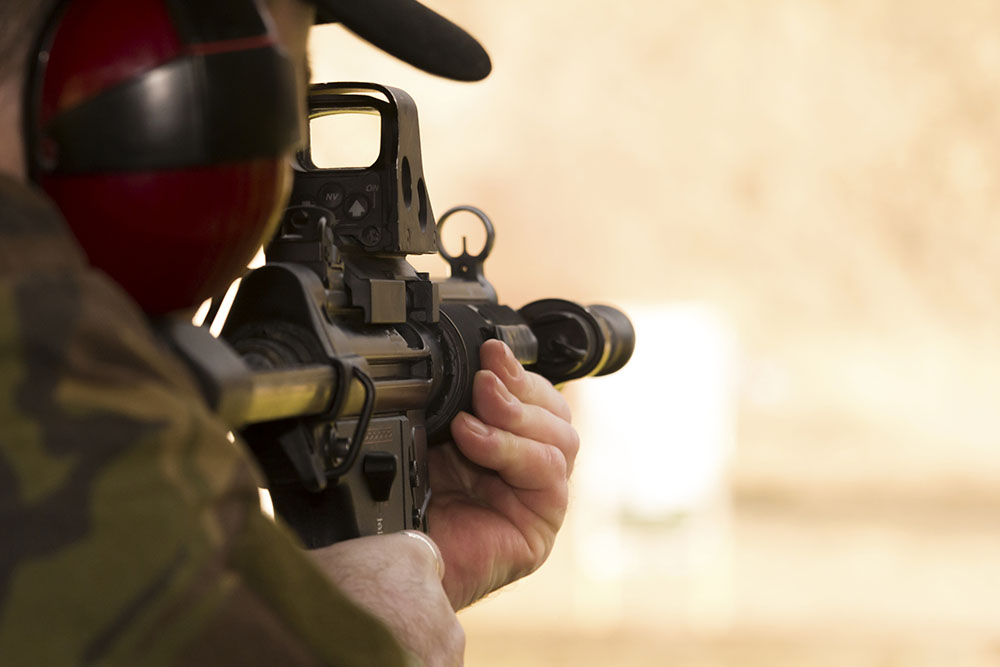
- Wear hearing and e protection when practicing with any firearm.
- Shoot only ammunition loaded to current SAAMI pressure specifications that meets the specifications indicated on the barrel of the firearm. Never insert a shell of incorrect gauge into any shotgun. Never insert a shell longer than the chamber length of your shotgun.
- Misfires may occur with any type of slug ammunition. Wait at least 30 seconds before opening the gun. Do not expose your face when opening the gun.
- Always keep your gun’s muzzle pointed downward during foul weather conditions.
Accessories
TarHunt carries a full line of cleaning products for the DSG slug gun. This includes custom made rifle-style brushes for shotgun bore sizes, cleaning patches and solvents.
“Guns, when used in a safe and conscientious manner, are a great source of freedom and recreation … but one careless moment can result in tragedy”!
These words of wisdom are as true now as the day they were first written. Please keep this in mind when you are using the RSG/DSG series or any other firearm!
From the time you pick up a firearm until the time you put it back down you become part of a system over which you have complete control and responsibility, You are the only part of the system that can make a gun safe …, or unsafe. Please read the following safety rules carefully and follow them always. Develop safe shooting habits and remember, firearm safety is up to you.
Gun Safety
- Always keep the muzzle of your firearm pointed in a safe direction. Be particularly aware of this safety rule when you are loading and unloading your weapon. This is the most basic safety rule, and should be followed even though you are “sure” the firearm is unloaded. Never point your gun at anything you do not intend to shoot.
- Before handling any firearm make sure that the weapon is completely unloaded, When cleaning, checking/changing choke tubes, and any time you are not actually attempting to shoot the firearm, make sure the weapon is empty and completely unloaded.
- Do not rely on your firearm’s safety device, Treat every firearm as though it were loaded and could fire at any time.
- The Safety on the RSG does not have to be moved from the ‘On Position’ to open the bolt. This allows the bolt to be cycled to unload the magazine safely.
- The Safety on the RSG is engaged when the Safety Arm is in the rear-most position marked “S”. Pushing it to the forward-most position will allow the RSG to be fired if the trigger is depressed.
- Be sure the barrel of your gun is clear of obstructions (i.e., cleaning patches, etc.,) before each usage. This is especially important if your RSG is equipped with a muzzle brake.
- Become familiar with the mechanical and handling characteristics of your gun prior to using it for the first time.
- Only shoot-in your RSG slug gun at a designated shooting range. Know your backstop area. Have a look at websites like RE Ranger to find accessories.
- Be sure of your target and what lies beyond. Once a gun is fired, you have given up all control over what the shot will hit.
- Wear hearing and eye protection when practicing with any firearm.
- Shoot only ammunition loaded to current SAAMI pressure specifications that meets the specifications indicated on the barrel of the firearm. Never insert a shell of incorrect gauge into any shotgun. Never insert a shell longer than the chamber length of your shotgun.
- Misfires may occur with any type of slug ammunition. Wait at least 30 seconds before opening the gun. Do not expose your face when opening the gun.
- Always keep your gun’s muzzle pointed downward during foul weather conditions.
Guns, when used in a safe and conscientious manner, are a great source of freedom and recreation … but one careless moment can result in tragedy! These words of wisdom are as true now as the day they were first written Please keep this in mind when you are using the RSG or any other firearm!!
Between hunting seasons and shooting sessions seal your unused slugs in a zip lock bag and pack them in a sealed ammo box. Store the cooler in an area of your home where the humidity is as low as possible and the temperature stays between 50 and 70 degrees Fahrenheit year-round. The more stable you keep the temperature of your slugs, the better they will shoot. When stored properly, slugs will shoot reliably even after 15 years.
After the season any ammo that was exposed to above normal dampness— Remove the ammo from the boxes. Let the ammo and the box exposed to the warm dry air in your home during the months of Jan & Feb. The low humidity present in most homes over those two months will remove all the moisture that was absorbed, by the powder, while hunting. Remember slugs are open ended, they are not sealed like the rounds used to hunt waterfowl, turkeys, etc.
Place the ammo back into the box, place the box in a zip-lock bag (the smaller the bag the better). Now placed the sealed bags in a seal able type ammo storage box, Styrofoam cooler, and keep the box where it is cool and dry.
Unless you open the plastic bag, the ammo will last 10 to 15 years. Next year if you use them, do not open the bag unless you are going to fire them. The extra rounds you carry hunting can just as easy stay in the bag, in your pocket as not. This drying out procedure can be done more that once
There are a lot of similarities between shooting rifles off the bench and shooting slug guns, however knowing and practicing the differences can equate to putting more meat in your freezer.
When you first arrive at the range be sure to create your shooting setup on a sturdy, fixed base such as a heavy table or bench. Position a solid rest under both the forend and butt portions of your gun’s stock. It is not sufficient to rest only the forend of your gun’s stock or to rest on a non-solid item such as a folded coat. Do not attempt to zero your gun from a non-fixed base like the hood of a truck.
Adjust the position of your gun as it sits in the forend and butt rests so that without having to touch the firearm the sight picture is dead on your target. Slide your body into shooting position without disturbing this sight picture. Begin applying shoulder pressure to the butt of the gun and offset any forward gun movement by pulling straight back with your right hand in trigger squeezing position. With your left hand on the forend of the gun’s stock, pull firmly straight back and down at a 45-degree angle. Hold this pressure on the gun as you concentrate on keeping the cross hairs fixed dead on your target. Squeeze the trigger gently straight back until the gun fires. It is common for a shooter to anticipate the gun blast as well as the recoil, but both should come as a complete surprise when a perfect shot is made.
Consistently integrating the above procedure into your shooting sessions will eventually produce shot groupings you will be proud of. Keep in mind that 60% of your overall group size can be directly attributed to inconsistent left hand pressure. Wind is also a significant negative factor when attempting to shoot small groups. Learn to read the wind!
“Problems with Recoil Reducing and Mechanical Rests”
Over the years, there have been hundreds of questions asking about the use of mechanical recoil limiting rests to zero slug guns such as:
“Would it be a wise move to build or use a locking type/heavy rest that would take all human error out of the process of sighting in a slug gun, except knowing when to pull the trigger because of the wind?”
The problem is when you use this type of rest, you artificially make the gun much heavier, more solid, than it is when used in the field.. You will end up sighting the gun in at a heavier artificial weight with a certain amount of muzzle jump. Then when you shoot the gun at game in the field at its normal weight, it WILL SHOOT to a different point of aim because you can no longer limit the muzzle jump to the same position, at the moment the slug leaves the barrel, while hunting, as it did at the range when you were sighting in using a locking/heavy type rest.
This is the same issue with any gun that has significant recoil and muzzle velocities under a 1900-2000fps range. Muzzle loaders/Slug Guns are all in the same boat. The time the bullet spends moving through the barrel (dwell time) during the recoil cycle is the same amount of time that the gun is being pulled off of the target, by recoil, until the bullet exits the barrel.
There is a huge difference in barrel dwell time between 1650-1900fps slug guns and rifles with muzzle velocities above 3000fps, such as varmint/magnum rifles. At above 3000fps guns move about .030ths of an inch and the bullet has already exited the muzzle and the dwell time has only a minor effect on the sighting in process. Physical recoil and noise are the main reasons for developing a flinch with those weapons.
This doesn’t even take into consideration the torque that is applied to the slug gun by a heavy slug being forced to spinning upwards of 50,000rpm’s instantly as it enters the barrel and all the time the slug is moving toward the muzzle when, using these types of rests..
Putting something on your shoulder, between you and the gun, is the best you can do to help tame the recoil of a slug gun. The muzzle must be left to jump according to how hard you hold your gun at both ends. Artificially adding weight to the gun by using a weighted rest or similar fixed gun rest may only create a missed deer in the field. You must hold the slug gun in such a manner, while sighting it in, that you can duplicate it in the field while shooting at game!! That includes the amount of muzzle jump you are allowing during the sight-in and gives “Overall Consistency in how you hold/grit the weapon round to round!!”
Bottom line, there is no magic fix. You will need to sit down and take somewhat of a thumping while sighting in a slug gun! I know there is a lot of recoil reducing advertisement out there and most of it works OK with rifles. They do reduce recoil with ML/Slug guns but it can have an adverse effect on your true zero! “Let’s not miss the Buck of a Life Time!”
Slug guns must be zeroed (sighted-in) at a distance where the slug will impact the target while still in the supersonic phase of its flight. Most slugs become subsonic, travelling less than 1220 feet per second, slightly beyond a muzzle distance of 50 yards, thus making 50 yards the ideal zeroing distance. Zeroing at 50 yards also cuts down, by approximately 60%, the chance of adjusting Windage error into your scope setting.
A common shortcut taken by a majority of shooters is the attempt to zero their guns at 100 yards. This is a serious mistake as several significant factors come into play that will prevent an accurate zero at this distance in all cases. When zeroing a slug gun at 100 yards only, you never know how much Windage is turned into your scope setting. Your gun becomes effectively sighted in for that day’s wind only, and your point of zero could be as much as 6 to 20 inches off of where it should be at 100 yards.
Zero your gun at 50 yards, 2-3/4″ high of absolute dead center on your target…no left, no right, simply 2-3/4″ high. You will then be dead-on zeroed at 100 yards because gravity will see to it. Check trajectory data for the brand of ammunition you are shooting and adjust the height of your 2-3/4″ 50 yard true zero as necessary so as to produce a dead-on gravity zero at 100 yards.
Once your gun has been zeroed at 50 yards, you should fire the weapon at a range of 100 and then again at 150 yards so that you can get a feel for how negative factors, such as wind drift, will affect your shot placement. A perfect hold at 100 yards may now produce a target impact as far as 6 to 8 inches off your point of aim, but since your gun has been precisely zeroed at 50 yards, you can be assured that this drift was caused by the effect wind of the day. Wind has more effect than most shooters realize on the flight of a large, relatively slow moving projectile such as a slug. Learning how to compensate for differing wind velocities and angles, especially at extended distances, is a lesson that must be learned if you wish to be consistently successful hunter and shooter with a DSG.
Although any type of DSG with rifled barrels perform similarly to rifles, they are not rifles and cannot be zeroed as if they were. Even the fastest slug is significantly slower than the typical rifle bullet. It is therefore extremely important to apply back-pressure to the forend of the stock with your left hand while you are shooting. Not doing so will result in the barrel of your slug gun jumping into the air off of the front rest, moving your point of aim and ruining your shot alignment before the slug even has a chance to exit the barrel.
Let’s say you have zeroed your gun in this manner at 100 yards, adjusting into your scope setting this muzzle jump as well as Windage error. While in the field you shoot at a deer at 100 yards while holding onto the forend of your gun’s stock. Your shot hits low or, most likely, misses completely. Most would tend to blame the gun or the ammunition, when in reality methodology is the real culprit. Think about it! Learn to properly set up your equipment and you can be confident in your shot when the time comes.
Here is what it takes with a DSG to shoot the “allusive 1 inch group at 100 yards”, but only if the shooter…
- Can find a lot of sabot ammunition that matches your barrel;
- Has a good rest to shoot off of and has spent the time necessary to learn how to shoot well off of it;
- Can find a telescope that will continue to work for more than 100 rounds. Most slug gun shooters cannot tell when a scope has gone bad;
- Remembers that riflesare zeroed (sighted-in) at 100 yards and then checked at 200 and 300 yards while DSG’sare zeroed at 50 yards and then checked at 100 and 150 yards;
- Remembers to always use a range-finderprior to taking any shot longer than 100 yards;
- Will spend the time to learn the intricacies of shooting slugs at 100 yards. for example, a 10 mph crosswind moves a slug 5 to 6 inches at 100 yards. A tail wind causes the impact point of a slug to move up, and a head wind will move the impactpoint down. It is evident that the slug movement of 6 to 20 inches at 100 yards is common. To take this a step further, a 15 to 17 mph cross wind, typical of what one might encounter during a November/December deer hunt, will move a slug 9 to 12 inches at 100 yards and a full 24 inches at 150 yards.